In geometry, height feels easy to picture when a shape is standing straight. But triangles can tilt, lean, stretch, or point in different directions, so finding the height can take a little more thinking. That's where the altitude comes in.
When we know how altitude works, we can use it to find an area, work with right triangles, apply the Pythagorean theorem, and solve many other geometry problems.
Today, we'll learn what an altitude is, how to identify it in acute, right, and obtuse triangles, and how to find its length using two different methods.

What Is the Altitude of a Triangle?
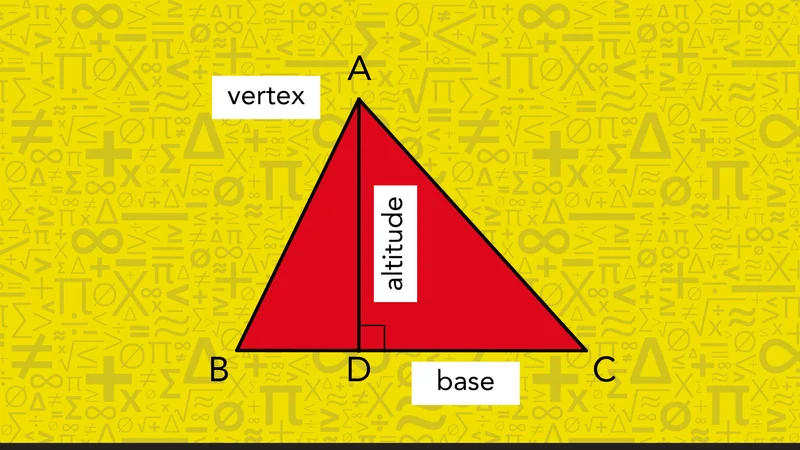
The altitude, or height, of a triangle is a perpendicular segment drawn from one vertex straight down to the line containing the opposite side, forming a right angle where it lands.
Think of triangle ∆ABC, with A as the top vertex and BC as the side across from it:
-
The altitude from A is the segment AD.
-
Point D is where AD meets BC at a right angle.
-
The side the altitude meets, BC, is the base for that altitude.
Every triangle actually has three altitudes, one from each vertex. But we usually only need to work with one at a time, depending on what the problem is asking.
We already found one altitude in triangle ∆ABC, AD. It starts at vertex A and belongs to base BC. Now let’s look at the altitudes that belong with the other two bases:
-
When AC is the base, the matching altitude starts at vertex B and meets AC at point E. That altitude is BE.
-
When AB is the base, the matching altitude starts at vertex C and meets AB at point F. That altitude is CF.
📕 You May Also Like: Types of Triangles for Grades 4–8: A Complete Guide
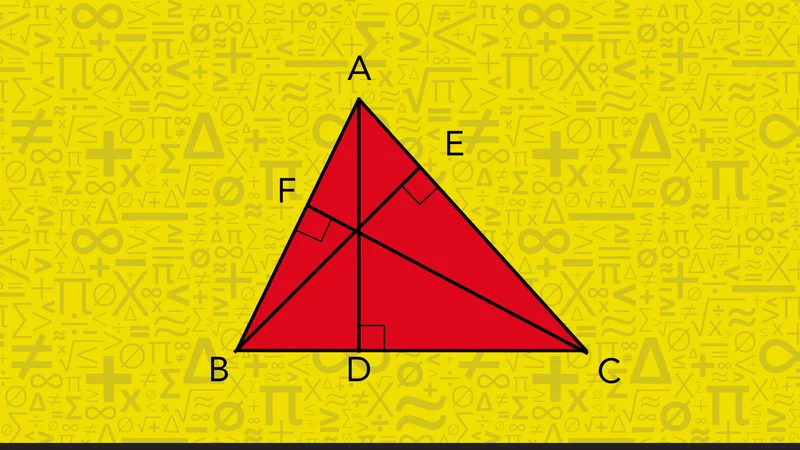
So triangle ABC has three altitude-and-base pairs:
-
AD with BC,
-
BE with AC,
-
CF with AB.
What Is Not a Triangle Altitude?
Triangle altitudes can be tricky because they do not always look the way we expect. Some segments may look like altitudes at first, so we need to check them carefully.
|
Visual #
|
Correct Spelling
|
Common Misspelling
|
|
#1
|
The side that only looks vertical on the page.
|
We cannot rely on how the triangle is turned on the page. We need to check whether the segment makes a right angle with the base or its extended line.
|
| #2 |
A slanted segment that reaches the opposite side but does not form a right angle.
|
The segment reaches the right side of the triangle, but that is not enough. We also need a 90° angle where it meets the base.
|
| #3 |
A segment from a vertex to the middle of the opposite side, without a right angle.
|
The segment may help us find the middle of a side, but we still need a right angle for it to count as an altitude.
|
| #4 |
A line that cuts a side in half at a right angle but does not start at the opposite vertex.
|
This line may be useful, but we need the segment to start at a vertex and meet the opposite side or its extension.
|
| #5 |
A segment that splits the top angle into two equal angles, without forming a right angle with the opposite side.
|
The segment may divide the angle evenly, but we still check where it lands. To be an altitude, it has to meet the opposite side, or its extension, at 90°.
|
The visual below shows what these “almost altitudes” can look like. Each number in the picture matches one row.

One segment can do more than one job. In certain triangles, the same segment may be an altitude and also split the opposite side in half or split the top angle evenly.
To decide whether it counts as an altitude, we need to make sure that it does all three things:
-
It starts at a vertex of the triangle
-
It meets the opposite side, or the line extending from that side
-
It forms a right angle (90°) at the point where it meets the side or extension
If one of these pieces is missing, the segment may still be part of the triangle, but it is not the altitude.
📕 You May Also Like: What Is Vertex? Everything You Need to Know
How to Identify the Altitude in Acute, Right, and Obtuse Triangles
To identify the altitude, we first need to notice what kind of triangle we are working with. The altitude follows the same rule every time, but its location can change depending on whether the triangle is acute, right, or obtuse.
Let’s look at each type and see where the altitude shows up.
Acute Triangles: The Altitude Falls Inside
In an acute triangle, where every angle measures less than 90°, every altitude falls neatly inside the triangle, landing somewhere along the opposite side itself.
To find the altitude of an acute triangle, we drop a straight perpendicular line from a vertex down to its opposite side. We do not need to extend the side outside the triangle because every angle is acute, and that line always lands directly on the segment.
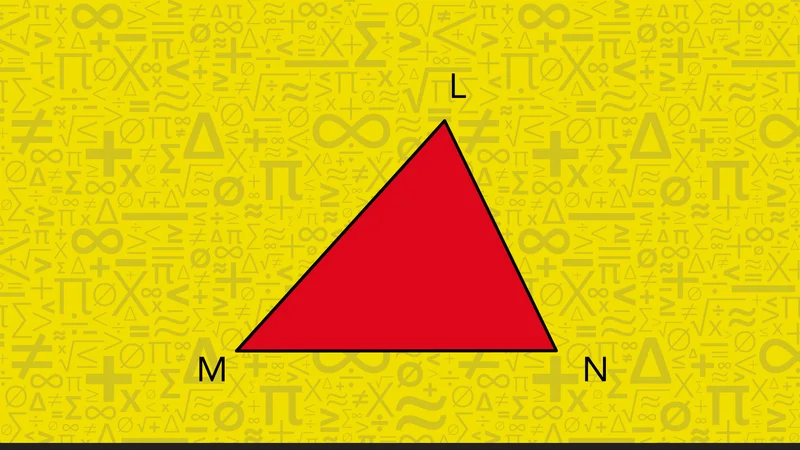
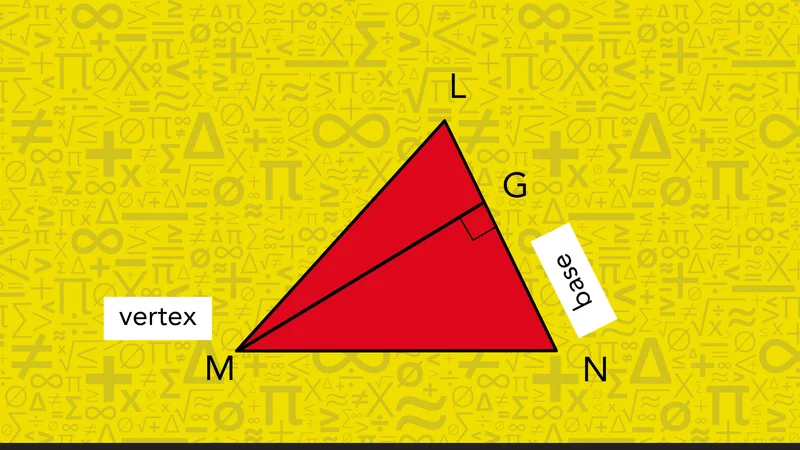
At Mathnasium, we like to explain each step by working through an example. So let’s imagine an acute triangle ∆LMN.
Step 1: Choose a vertex
We pick the vertex we want to drop the altitude from. Let's use the vertex M of our triangle.
Step 2: Identify the opposite side
We look directly across from that vertex to find the side we'll be dropping our altitude toward, the base for this particular altitude. In the triangle ∆LMN, we start from vertex M, so the opposite side is LN. That means LN is the base for the altitude from M.
Step 3: Drop a perpendicular to the base
We draw a straight line from the vertex M to the opposite side LN, making sure it meets that side at a right angle. Let’s call that meeting point G. That means MG is an altitude of ∆LMN.
📕 You May Also Like: Types of Angles: Acute, Right, Obtuse & Straight Explained
Right Triangles: One Altitude Is Already a Side
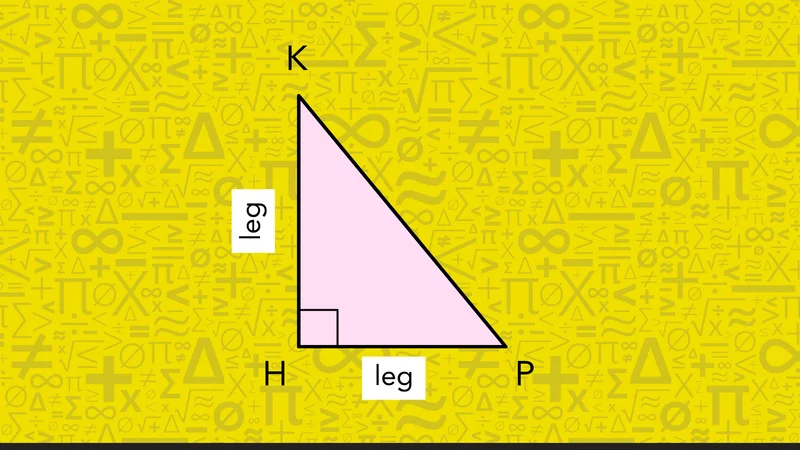
In a right triangle, two of the sides are already perpendicular to each other. Those two sides are called the legs. If we choose one leg as the base, the other leg already works as the altitude. We do not need to draw a new line because the altitude is already part of the triangle.
There is another altitude in a right triangle too, the one from the right-angle vertex to the side across from it. For that altitude, we follow the usual steps: start at the vertex opposite the base and draw a line that meets the base at a right angle.
But, now, we’ll focus on the case where we use a leg as the base, which is unique to right triangles. Let’s walk through an example. Picture a right triangle, ∆KHP.
Step 1: Identify the right angle
We locate the vertex where the two legs of the triangle meet at exactly 90°. In the ∆KHP, that is vertex H.
Step 2: Choose one leg as the base
We pick one of the two legs meeting at that right angle to serve as our base. We’ll take the leg HP as our base.
Step 3: Recognize the other leg as the altitude
The two legs are already perpendicular to each other, so the other leg, KH, is the altitude for the base we just chose. We do not need to draw any extra lines.
If we choose KH as the base, then the other leg, HP, works as the altitude. But if we choose KP as the base, the altitude looks different. KP does not meet either leg at a right angle, so we need the altitude from the opposite vertex, H, to meet KP at 90°.
Obtuse Triangles: The Altitude Falls Outside
With an obtuse triangle, one angle is greater than 90°, so the altitude can be harder to spot.
The altitude still starts at a vertex and meets the opposite side at a right angle. But in an obtuse triangle, the altitude from one of the two acute angle vertices lands outside the triangle.
That means, to identify the altitude from a vertex that forms an acute angle, we need to extend the base line first. Then we can draw the perpendicular line from that vertex to the extended line.
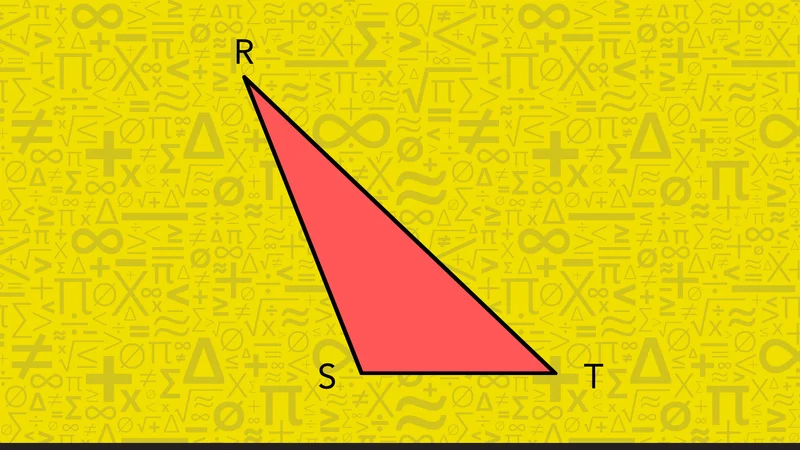
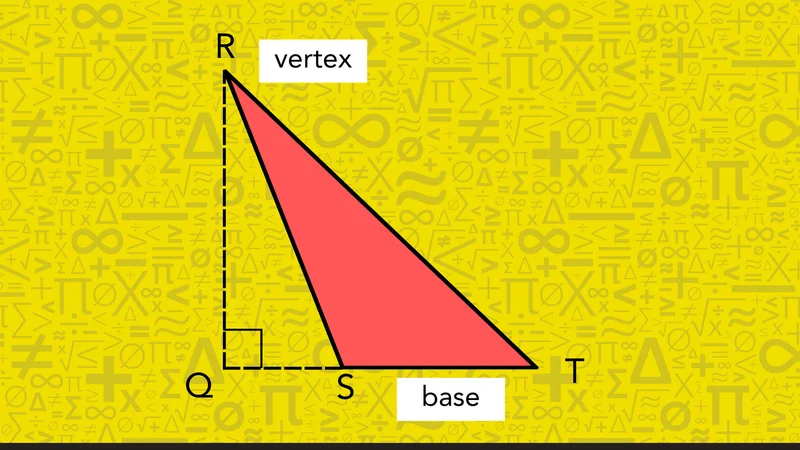
We’ll see how it works through an example. Think of an obtuse triangle, ∆RST.
Step 1: Identify the obtuse angle and vertex
In triangle RST, the obtuse angle is ∠RST, so the obtuse angle is at vertex S.
Step 2: Extend the base line
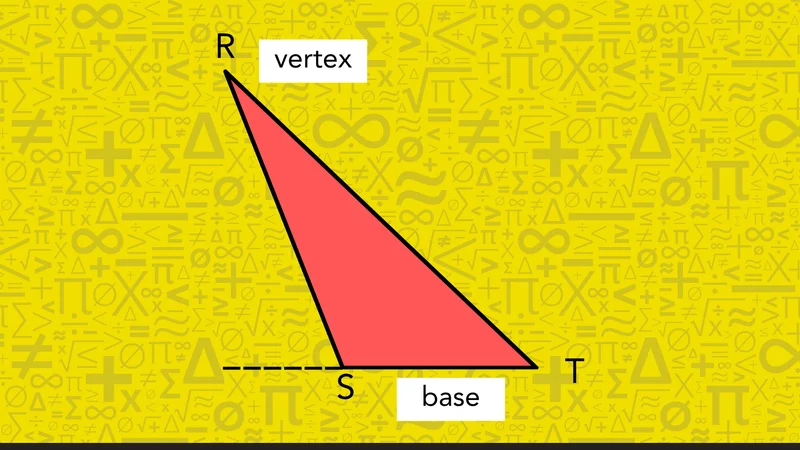
To identify the altitude from vertex R, we use ST as the base. Because vertex R forms an acute angle, a perpendicular from R will land outside the triangle instead of on the segment ST. So before we draw the altitude, we extend the line containing ST beyond the triangle.
Step 3: Drop the perpendicular to the extended line
Now we draw a line from vertex R to the extended line containing ST, making sure it meets that line at a right angle. Let’s call the meeting point Q. The perpendicular RQ lands outside the original triangle, but RQ is still the altitude from R to base ST.
Try Spotting the Altitude Yourself!
Now, you can practice identifying where the altitude falls on your own. Check your answers at the bottom of the page.
Problem 1:
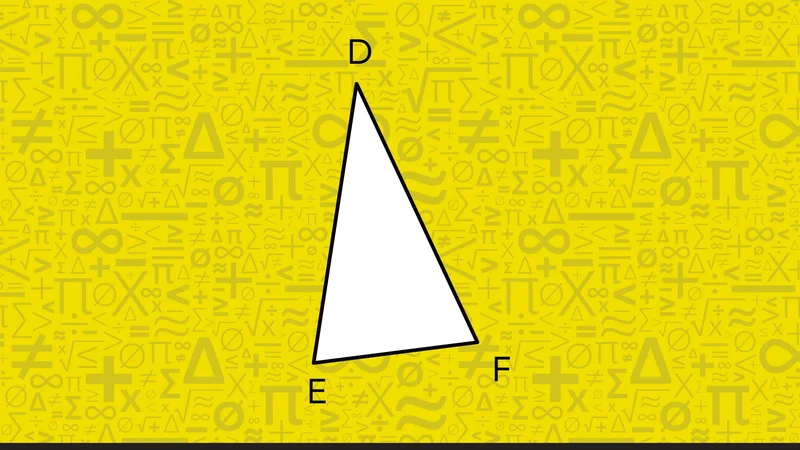
Given a triangle ∆DEF, which side does the altitude from the top vertex D meet, and does it fall inside the triangle?
Problem 2:
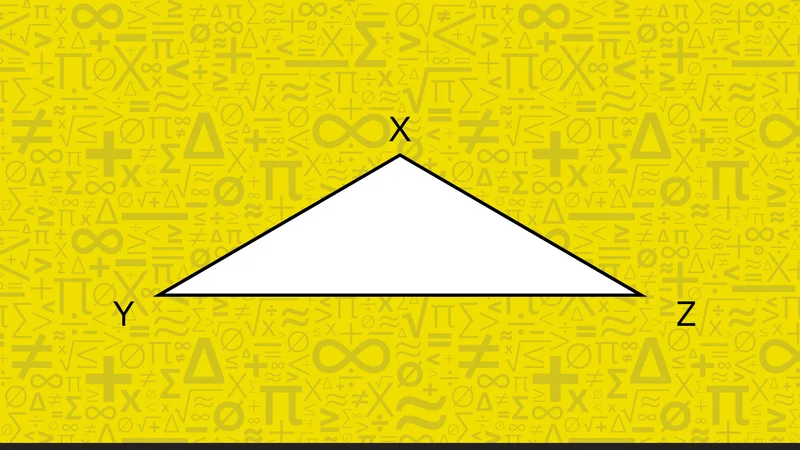
In a triangle ∆XYZ, the angle ∠YXZ is obtuse. For the vertex marked Z, does its altitude meet the base itself or an extension of the base? Explain your answer.
📕 You May Also Like: Why Math Practice Matters & What Happens When Kids Skip It

Mathnasium tutors use a variety of interactive techniques to help students truly understand abstract math concepts.
How Mathnasium Helps Students Understand Triangle Altitudes and Any Other Math Topic
Mathnasium is a math-only learning center dedicated to helping K–12 students of all skill levels excel in math.
We’ve worked with thousands of students, and we know that geometry concepts, like the altitude of a triangle, become clearer when students can see the relationships behind the terms they are learning.
When students understand that relationship, they can use altitudes more comfortably in area, triangle, and coordinate geometry problems.
To support that understanding, we use the Mathnasium Method™, our proprietary teaching approach, to meet students where they are and guide them toward math mastery, step by step.
Each student begins their Mathnasium journey with a diagnostic assessment, which helps us identify their current skills, knowledge gaps, and how they think about math, including the geometry, spatial reasoning, and measurement skills behind triangle altitudes.
Using these insights, we create a personalized learning plan focused on the skills the student needs most, whether that means identifying triangle parts, comparing acute, right, and obtuse triangles, or preparing for more advanced geometry.
Our specially trained tutors follow the plan closely, delivering face-to-face instruction in a caring and supportive environment, both in-center and online. We teach through a mix of visual, verbal, tactile, written, and mental techniques so each concept lands clearly.
For topics like triangle altitudes, students may draw altitudes, rotate triangles, and compare examples. This helps them see geometry as a connected set of relationships rather than just a collection of diagrams.
Our tutors also give students room to think through problems before stepping in. They guide students to notice structure, explain their reasoning, and connect visual models to formulas. This helps students build problem-solving skills, critical thinking, and greater independence in math.
Fun is a core part of our approach, too. We use hands-on and game-based activities, rewards, and consistent encouragement to keep students engaged as they build confidence with visual reasoning, geometry, and problem-solving.
Families see the difference:
-
94% of parents report improvement in their child’s math skills and understanding
-
93% of parents report a more positive attitude toward math after attending Mathnasium
-
90% of students saw improvement in their school grades
With over 1,100 learning centers across North America, there is likely a Mathnasium close to you.
For families in and near Round Rock, TX, Mathnasium of Round Rock East brings that same approach close to home, with specially trained tutors who help students build geometry skills, understand triangle properties, and develop confidence in math.
If triangle altitudes, geometry, or the visual reasoning behind them feel challenging for your child, a free diagnostic assessment is a great place to start. From there, we’ll create a personalized learning plan that helps your child master the skills they need next.
📅 Schedule a Free Assessment at Mathnasium of Round Rock East
Not near Round Rock East?
📍 Find a Mathnasium Learning Center Near You
Check Your Answers Here!
Ready to see how you did? Here's a quick rundown of each answer.
-
The altitude from the top vertex D meets the opposite side, EF, directly, and it falls inside the triangle, since all angles are acute.
-
The altitude from the vertex Z meets an extension of the base line, XY (past vertex X), because the triangle is obtuse and vertex Z is one of the two acute angle vertices.


 (512) 246-6284