The word “diamond” can bring different images to mind. Some people imagine a 3D gemstone, while others picture the flat, 2D shape we can draw on paper. In mathematics, the shape most people call a diamond is formally known as a rhombus.
If you'd like to learn more about rhombuses, Mathnasium tutors have your back. Today, we'll look at real-life examples, definitions, properties, and formulas that show what makes this shape unique and how to measure it.

How Do We Define a Rhombus?
A rhombus is a four-sided, two-dimensional shape (a quadrilateral) where all four sides are the same length.
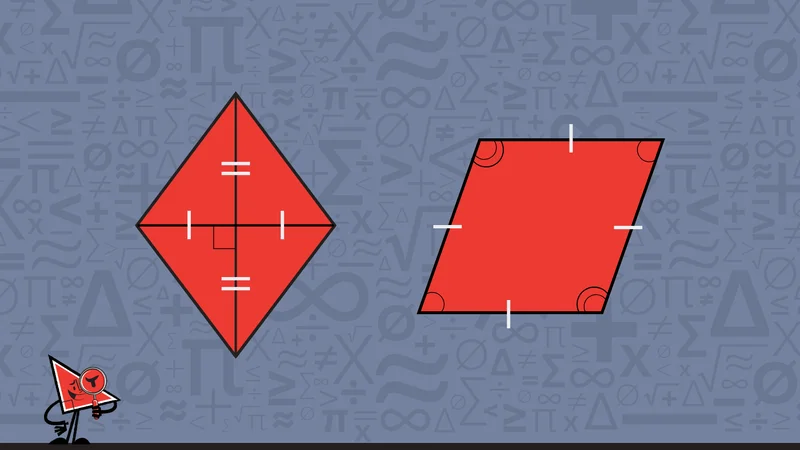
Every rhombus shares a few properties that help us identify it:
While these properties help us identify a rhombus, some of them are shared by other quadrilaterals. Our tutors often see students mix them up. So, let's look at the defining features that set them apart from a rhombus.
📕 You May Also Like: 2D Shape Names: The Complete List from 3 to 12 Sides (Grades 3–7)
Rhombus vs. Square vs. Parallelogram vs. Kite: What Is the Difference?
We can easily mistake a rhombus for other quadrilaterals because some of their properties are the same.
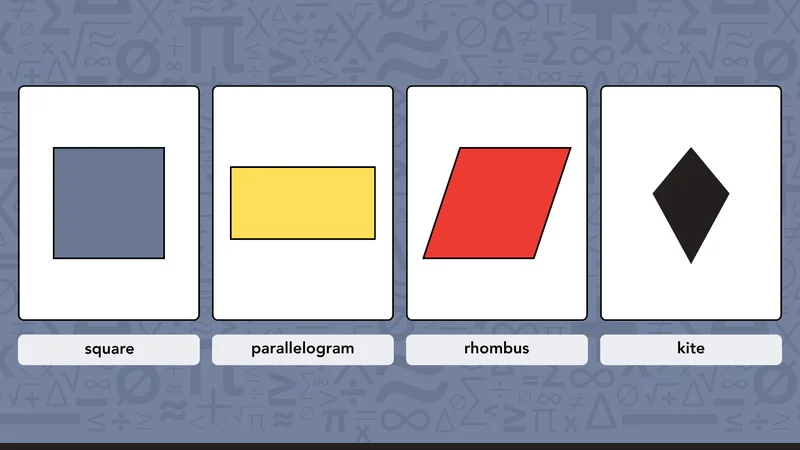
Let's see how a rhombus compares with a square, a parallelogram, and a kite.
|
Shape
|
All Four Sides Equal
|
Opposite Sides Parallel
|
All Angles 90°
|
|
Rhombus
|
Yes.
|
Yes.
|
No (unless it is also a square).
|
|
Square
|
Yes.
|
Yes.
|
Yes.
|
|
Parallelogram
|
No (opposite sides equal only).
|
Yes.
|
No.
|
|
Kite
|
No (two pairs of adjacent equal sides).
|
No.
|
No.
|
Before we move on, take another look at the comparison table. What differences do you notice?
First, a parallelogram has only two pairs of equal sides, while a kite has two pairs of adjacent equal sides and no parallel opposite sides.
One more important relationship deserves a closer look because it often leads to a common misconception about squares and rhombuses. Every square is a rhombus because it has four equal sides, but not every rhombus is a square because rhombuses do not require right angles.
📕 You May Also Like: Regular vs. Irregular Polygons: What's the Difference?
4 Rhombus Examples in Real Life
Geometry concepts often feel abstract until we start noticing them in the world around us. Rhombuses appear in everyday objects because their shape is both practical and visually appealing.
Let’s look at a few places where we can spot them.
1. Playing Card Diamonds
The diamond suit in a standard deck of playing cards is perhaps the most familiar example of a rhombus shape. Four equal sides create the balanced, visually symmetrical form we commonly associate with a “diamond.”
The symbol appears throughout the suit, from the ace to the numbered and face cards, which makes this geometric shape part of an object many of us have seen or used.

The next time you play cards, take a closer look at the diamond suit. It's a rhombus!
2. Car Jacks
Car jacks offer a practical example of how changing the angles of a rhombus can create movement. The scissor-style jack commonly used to lift a car has four linked arms arranged in a rhombus.
As the jack operates, the opposite joints move closer together or farther apart, which changes the height of the rhombus and raises or lowers the car. The arm lengths remain fixed as the angles change, so we can still recognize the rhombus structure throughout the movement.

Geometry may be the last thing on your mind when you use a car jack to change a flat tire, but there’s a rhombus right there in the mechanism.
3. Rhombus Floor and Wall Tiles
Rhombus shapes also appear in decorative floor and wall tiles, where their equal sides and slanted angles create distinctive geometric patterns.
When identical rhombus tiles are placed edge to edge, they can cover a surface without leaving gaps or overlaps. This type of repeating arrangement is called a tessellation, and it allows a simple four-sided shape to create anything from rows of diamonds to more intricate geometric designs.
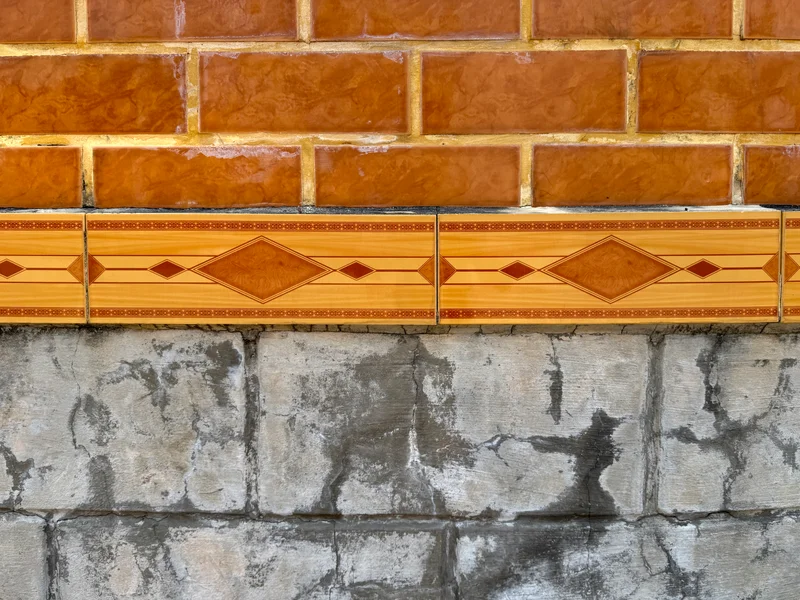
Rhombus tiles can turn a stone wall into a decorative pattern.
4. Argyle Patterns
Rhombuses have also found their way into fashion through the classic argyle pattern. Commonly seen on sweaters and socks, argyle combines rows of diamond shapes, often with thin diagonal lines crossing over them.
The pattern has become especially recognizable on knitwear, so you may already have a few rhombuses hiding somewhere in your wardrobe.

Take a look in your closet. You may find a pair of socks or another piece of clothing with a whole row of rhombuses woven into the design.
📕 You May Also Like: Math for Life: Why Math Skills Matter Beyond School
How to Measure a Rhombus
We can measure a rhombus in different ways depending on the information we have, whether that's the side length, the base and perpendicular height, or the lengths of the diagonals.
Let's see how to use each formula with simple worked examples.
1. Perimeter of a Rhombus
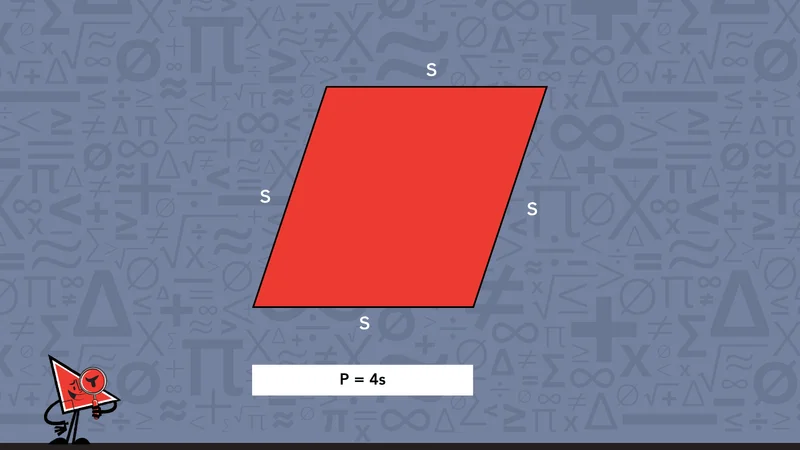
The perimeter of a rhombus is the total distance around its four outer sides. Because all four sides of a rhombus are always equal, we only need to know the length of one side to find the full perimeter.
We can calculate the perimeter by multiplying the length of one side by four, so we use the formula P = 4s, where:
Let's put it into practice with a simple example: A rhombus has a side length of 7 cm. What is its perimeter?
Since the side length is 7 cm, we substitute 7 for s in the formula, so P = 4 × s becomes P = 4 × 7. We then multiply 4 × 7 to get 28, so P = 28 cm.
The perimeter of the rhombus is 28 cm.
📕 You May Also Like: Perimeter vs. Area: Why Kids Mix Them Up and How to Teach the Difference
2. Area of a Rhombus Using Base and Height
We can find the area of a rhombus when we know the length of its base and its perpendicular height.
The base tells us how far the rhombus extends across, while the perpendicular height tells us the distance between its two parallel sides, measured at a right angle.
When we multiply these measurements, we get the total space inside the rhombus (or its area). We can express this relationship with the formula A = b × h, where:
-
A = area
-
b = the length of the base (any one side of the rhombus)
-
h = the perpendicular height (the vertical distance between the two parallel sides, measured at a right angle)
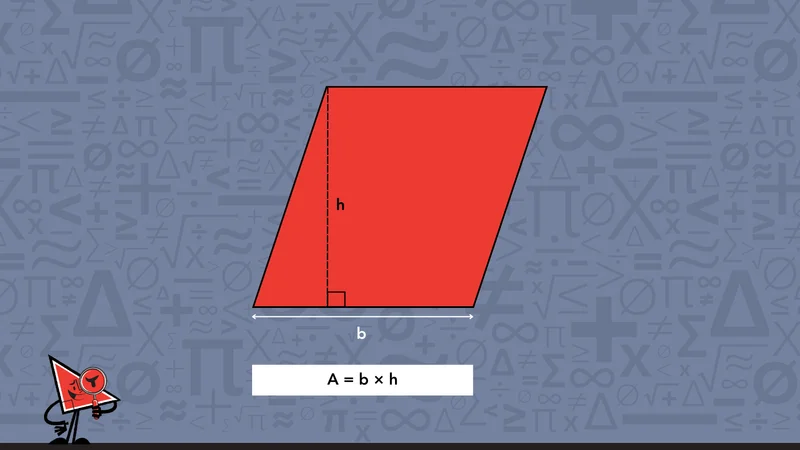
Let's try to solve another simple example: A rhombus has a base of 8 cm and a perpendicular height of 5 cm. What is its area?
Since the base is 8 cm and the perpendicular height is 5 cm, we substitute those values into the formula, so A = b × h becomes A = 8 × 5. We then multiply 8 × 5 to get 40, so A = 40 cm².
The area of the rhombus is 40 cm².
When using this formula, remember that the height is always measured at a right angle between the two parallel sides. The slanted side length does not represent the height unless the rhombus is also a square.
3. Area of a Rhombus Using Diagonals
Sometimes we know the lengths of the diagonals instead of the base and height, so we can use them to find the area.
The diagonals of a rhombus intersect at a right angle and divide each other in half, creating four congruent right triangles.
When we add the areas of those four triangles together, we get the total area of the rhombus. Because the diagonals divide the rhombus in this way, we can find the area by multiplying their lengths and dividing the result by 2.
To do this, we use the formula A = (d₁ × d₂) ÷ 2, where:
-
A = area
-
d₁ = the length of the first diagonal (the longer one)
-
d₂ = the length of the second diagonal (the shorter one)
-
÷ 2 = because multiplying the lengths of the diagonals gives twice the area of the rhombus
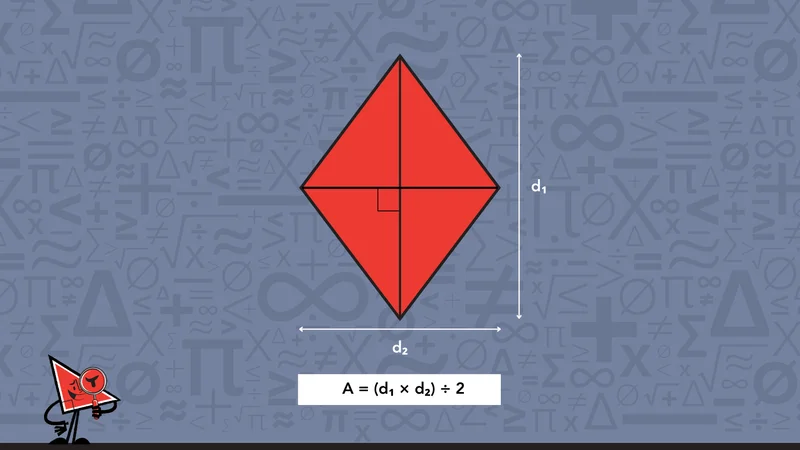
Let's use this formula to work through the following example: A rhombus has diagonals measuring 10 cm and 6 cm. What is its area?
Since the diagonals measure 10 cm and 6 cm, we substitute those values into the formula, so A = (d₁ × d₂) ÷ 2 becomes A = (10 × 6) ÷ 2. We first multiply 10 × 6 to get 60, then divide 60 by 2 to get 30, so A = 30 cm².
The area of the rhombus is 30 cm².
📕 You May Also Like: What Is Area in Math? A Complete & Kid-Friendly Guide
Frequently Asked Questions About Rhombuses
We will now answer a few questions that can help clear up some of the confusion students may have when they first start learning about rhombuses.
1. Can a rhombus have an obtuse angle?
Yes. As long as all four sides remain equal, a rhombus can have any pair of supplementary angles, with opposite angles equal and adjacent angles adding up to 180°. For example, a rhombus with angles of 60° and 120° is perfectly valid. The angles are all 90° only when the rhombus is also a square.
2. Is a rhombus a regular polygon?
No, because a regular polygon has all sides and all angles equal. A rhombus has equal sides, but its angles are not always equal, so it is not usually a regular polygon. The only exception is again a square, where all four sides are equal, and all four angles are 90°.
3. When do students learn about rhombuses in school?
Students typically begin identifying rhombuses by their equal sides in Grades 2 to 3. In Grades 4 to 5, they explore how rhombuses relate to parallelograms and squares while studying their sides, angles, and lines of symmetry.
From Grade 6 onward, students classify rhombuses using coordinate geometry, angle properties, and congruence theorems, then apply what they learn in geometry problems and proofs.
📕 You May Also Like: 10 Geometry Concepts Students Should Master Before 10th Grade

At Mathnasium, we help students build a deeper understanding of geometry through visual learning and guided problem-solving.
How Mathnasium Helps Students Master Geometry Concepts and Beyond
Mathnasium is a math-only learning center dedicated to helping K–12 students of all skill levels excel in math.
Whether students are building foundational geometry skills, such as understanding shapes and their properties, or moving on to more advanced concepts, we help them develop a deep understanding that supports future learning.
Our specially trained geometry tutors help students understand how geometry concepts connect to logical reasoning and real-world applications. As students build that understanding, they also develop confidence that extends well beyond a single lesson.
We make that possible through the Mathnasium Method™, our proprietary teaching approach that is designed around each student's needs and learning style.
Our approach includes:
-
Assessment and Personalized Learning Plans: Each student begins their Mathnasium journey with a diagnostic assessment that identifies current skills, strengths, and gaps. From those findings, we build a personalized learning plan tailored to their goals, whether that means strengthening foundational geometry skills, mastering rhombus formulas, or preparing for the coordinate geometry and analytical reasoning required in middle and high school math.
-
Teaching for Understanding: Our specially trained tutors use natural language and a mix of verbal, visual, mental, tactile, and written techniques so each concept lands before we move forward.
-
Problem-Solving and Critical Thinking: We give students time to work through problems independently. That productive struggle helps them learn to trust their own reasoning. When we do step in, we explain both the how and the why behind each answer, so students build problem-solving and critical thinking skills they can use in math and beyond.
-
An Engaging and Fun Learning Environment: Sessions include games, earned rewards, and consistent celebration of progress. Students build confidence alongside fluency, and many develop a more positive relationship with math over time.
The impact extends beyond the classroom:
-
94% of parents report an improvement in their child's math skills and understanding
-
93% of parents report their child's improved attitude toward math after attending Mathnasium
-
90% of students saw an improvement in their school grades
With over 1,100 learning centers across North America, there is likely a Mathnasium close to you.
Whether your student is looking to catch up, keep up, or get ahead in math, your local Mathnasium center can help.
Start by booking a diagnostic assessment, and together we'll create a personalized plan for math mastery.